Thursday, 21 May 2015

How to Install and Configure HAProxy on CentOS/RHEL 7/6/5

HAProxy is a very fast and reliable solution for high availability, load balancing, It supports TCP and HTTP-based applications. Now a days most of websites need 99.999% uptime for there site, which are not possible with single server setup. Then we need some high availability environment which can easily manage with single server failure.


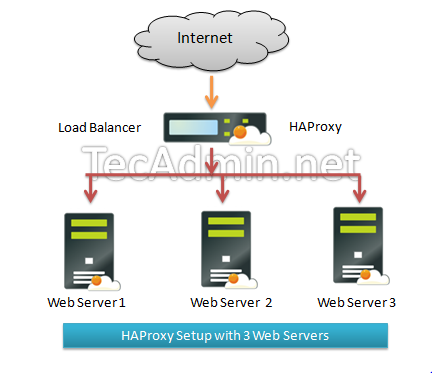
This article will help you to install HAProxy on CentOS, RHEL servers and will configure a Layer 4 Load Balancing (Transport Layer). Which will balance load and transfer requests to different-2 servers based on IP address and port numbers.
1- Install HAProxy
HAProxy package is available under default yum repository for CentOS, Redhat systems. Use the following yum package manager command to install HAProxy on your system.
# yum install haproxy
Step 2: Configure HAProxy
Update your HAProxy configuration file /etc/haproxy/haproxy.cfg as per your requirement, You may also use below given configuration file as an example of setup and modify it.
# vim /etc/haproxy/haproxy.cfg
[ Update red mark values as per your network setup ]
global
        log 127.0.0.1   local0
        log 127.0.0.1   local1 debug
        maxconn   45000 # Total Max Connections.
        daemon
        nbproc      1 # Number of processing cores. 
defaults
        timeout server 86400000
        timeout connect 86400000
        timeout client 86400000
        timeout queue   1000s
        
# [HTTP Site Configuration]
listen  http_web 192.168.10.10:80
        mode http
        balance roundrobin  # Load Balancing algorithm
        option httpchk
        option forwardfor
        server server1 192.168.10.100:80 weight 1 maxconn 512 check
        server server2 192.168.10.101:80 weight 1 maxconn 512 check

# [HTTPS Site Configuration]
listen  https_web 192.168.10.10:443
        mode tcp
        balance source# Load Balancing algorithm
        reqadd X-Forwarded-Proto:\ http
        server server1 192.168.10.100:443 weight 1 maxconn 512 check
        server server2 192.168.10.101:443 weight 1 maxconn 512 check  
Change the ips in configuration file as per your network setup. In HTTP Site Configuration section if any request on ip 192.168.10.10 on port 80, this will be redirected to port 80 of 192.168.10.100 or 192.168.10.101 servers. Similarly in HTTPS Site Configuration if any request on ip 192.168.10.10 on port 443, this will be redirected to port 443 of 192.168.10.100 or 192.168.10.101 servers.
You also need to make few changes in configuration file as per your system configuration.
  • nbproc <value> # Number of processing cores in your system.
  • mode <value> # ‘http’ for http site and ‘tcp’ for https site
  • balance <value> # Type of load balancing like ‘source’, ’roundrobin’ etc.
  • Step 3: Start HAProxy Service
    Start HAProxy service using following command, also configure it to auto start on system boot.
    # service haproxy start
    # chkconfig haproxy on
    
    And You have done it.
     

Monday, 18 May 2015

Managing Office 365 using Powershell

Introduction

Powershell is an incredibly powerful tool that if you're not already using it and you're a Windows Systems Administrator you will want to make it a priority. It is even more necessary if you are considering making the jump to Office 365. Microsoft does not give you access to the back end management software for Exchange (ESM), or SharePoint (Central Administration). Instead there is a chopped down web interface that provides you with the basics, and Powershell is used to fill in the gaps. Gaps like, giving editing rights to a shared calendar and many more.
There are a few steps that you will need to take before you can start using Powershell to manage your Office365 domain.


Prerequisite software

OS:
Windows 7, Windows 8, Server 2008 R2, Server 2012, or Server 2012 R2
Powershell:
If you're running Win7 or newer you will have Powershell all ready installed. If not you will need to download and install it. You can get Powershell 4.0 here: http://www.microsoft.com/en-us/download/details.aspx?id=40855. Warning, if you're managing Exchange 2010 or earlier on premise with Powershell you will need to use Powershell 2.0.
.NET Framework:
You have to have .NET Framework 3.51 installed.
Microsoft Online Services Sign-in Assistant:
You will need this small piece of software installed to be able to connect to Office365. It is also necessary for running the Lync client on your desktop. You can download it here:
http://go.microsoft.com/fwlink/?LinkId=286152

Install Office 365 Cmdlets/AD Azure Module

The next thing that you will need is access to the Office365 cmdlets so that you will have the commands that you need to manage your domain. You will need to download and install these files:
32 bit - http://go.microsoft.com/fwlink/p/?linkid=236298
64 bit - http://go.microsoft.com/fwlink/p/?linkid=236297

If you're running a 64bits computer:
Copy the folder MSOnline from (1) –> (2) as seen here
1) C:\Windows\System32\WindowsPowerShell\v1.0\Modules(MSOnline)
2) C:\Windows\SysWOW64\WindowsPowerShell\v1.0\Modules(MSOnline)

Scripting your connection

Once you have finished the above you're ready to actually connect to your Office365 domain. Here is the syntax that you will need to run:
Import-Module MSOnline
$O365Cred = Get-Credential
$O365Session = New-PSSession –ConfigurationName Microsoft.Exchange -ConnectionUri https://ps.outlook.com/powershell -Credential $O365Cred -Authentication Basic -AllowRedirection 
Set-ExecutionPolicy RemoteSigned
Import-PSSession $O365Session -AllowClobber
Connect-MsolService –Credential $O365Cred

Command to disconnect your session after your work:
Remove-Module MsOnline

Handy Power Shell Commands
https://drive.google.com/open?id=0Bwl5ORajpx3GdGJQWFdMeVlMNWs&authuser=0 

Thursday, 7 May 2015

Request or Renew the certificate on Domain Controller


Renewing an expired Domain Controller certificate

Symptoms of this were unable to connect to WiFi using RADIUS
Event viewer audit log showed Network policy server; Audit Failures to wlc
To resolve on the domain controller.
Run mmc and load the certificates plugin for the computer account


Right click personal and select “Request New Certificate”


Next


Next


Select “Domain Controller” and then click “Enroll”


Finish and then check that the certificate is now present in Personal/Certificates


Wednesday, 6 May 2015

How to Generate a Public/Private SSH keys

Before generating any key check the .ssh folder in user directory for previous generated keys.
$ cd ~/.ssh
$ ls
id_rsa  id_rsa.pub  known_hosts
If you see some previously generated keys (id_rsa, id_rsa.pub files), you should backup those keys, otherwise skip the step below and jump to Generate a key for the first time.
$ mkdir ssh_keys_backup
$ cp id_rsa* ssh_keys_backup
$ rm id_rsa*
Now you are ready to generate the key. Proceed to Generate a key for the first time

Generate a key for the first time
At the prompt, enter:
ssh-keygen -t rsa -C "Linux Key"
You should see:
Generating public/private rsa key pair.
Enter file in which to save the key (/home/user/.ssh/id_rsa):
Press 'Enter' here to accept the default.
Enter passphrase (empty for no passphrase):
Enter same passphrase again:
DO NOT just press enter to leave the passphrase empty. It is important that you use a strong passphrase for this key. If you do not use a passphrase, anyone who gets access to your key (such as if your laptop were stolen or your computer got a virus) could easily commit code as you -- people who trust you could then run malicious code, compromising their servers.
Your identification has been saved in /home/user/.ssh/id_rsa.
Your public key has been saved in /home/user/.ssh/id_rsa.pub.
The key fingerprint is:
7e:f5:7e:51:ec:3d:2c:36:02:9d:5b:89:4a:3a:b7:b5 Linux Key


Copy your key

Once the key pair is generated, it's time to place the public key on the virtual server that we want to use.
You can copy the public key into the new machine's authorized_keys file with the ssh-copy-id command. Make sure to replace the example username and IP address below.
ssh-copy-id username@123.45.56.78
Alternatively, you can paste in the keys using SSH:
cat ~/.ssh/id_rsa.pub | ssh username@123.45.56.78 "mkdir -p ~/.ssh && cat >>  ~/.ssh/authorized_keys"
No matter which command you chose, you should see something like:
The authenticity of host '12.34.56.78 (12.34.56.78)' can't be established.
RSA key fingerprint is b1:2d:33:67:ce:35:4d:5f:f3:a8:cd:c0:c4:48:86:12.
Are you sure you want to continue connecting (yes/no)? yes
Warning: Permanently added '12.34.56.78' (RSA) to the list of known hosts.
user@12.34.56.78's password:
Now try logging into the machine, with "ssh 'user@12.34.56.78'", and check in:

  ~/.ssh/authorized_keys

to make sure we haven't added extra keys that you weren't expecting.
Now you can go ahead and log into username@12.34.56.78 and you will not be prompted for a password. However, if you set a passphrase, you will be asked to enter the passphrase at that time (and whenever else you log in in the future).


Sunday, 3 May 2015

Customizing the ADFS forms based login page

By default, the ADFS forms based login page supplied by an ADFSProxy server is a best pretty boring and at worst inaccurate.

Out of the box, it looks like this:

Wouldn't it be nice to:
  • Add some pretty logos?
  • Correct that Domain\username example so it show UPN format?
  • Change the instruction text?
  • Give the page a better title than "Sign In"?
  • Remove or change that hostname header above the login box?
  • Add an "Authorized Use" text block at the bottom to keep the lawyers from bugging you?


Well, if you agree, today is your lucky day!
Please, keep in mind that it is quite possible (likely even) that some of the changes I describe below will be overwritten when you apply any update to ADFS. Make sure you:
  1. Back up your original files, in case you need to revert to the stock config
  2. Have backup copies of your changes, in case they get stomped on by an update.
  3. Understand that you may have to re-do your changes after an update as the underlying files may change.

These instructions are applicable to ADFS 2.0 with update rollup 2. I have not tested this with any other past or future version.
Having covered all necessary behinds…on with the show

Adding a Logo

  • Logo image file should be 600x100
  • Save image file to c:\inetpub\adfs\ls\logo.jpg (or logo.png)
  • Open c:\inetpub\adfs\ls\web.config in notepad
  • Locate text
    <!--
    <add key="logo" value="logo.jpg" />
    -->
  • Remove the "<!--" and "-->" to uncomment the section. Change filename to match the logo you saved.
  • Save file and close


Change the "Example" Instructions

  • Go to C:\inetpub\adfs\ls\App_GlobalResources
  • Edit file CommonResources.en.resx in Notepad (replace the "en" with your localization code if not English)
  • Locate text:
    <data name="UsernameExample" xml:space="preserve">
    <value>Example: Domain\Username</value>
    </data>
  • Edit this text to be what you want
  • Save File and close

Change the Instruction Text

  • Edit CommonResources.en.resx in Notepad as per item above
  • Locate text:
    <data name="FormsSignInHeader" xml:space="preserve">
    <value>Type your user name and password.</value>
    </data>
  • Edit this text to be what you want
  • Save file and close

Change the Page Title

  • Go to C:\inetpub\adfs\ls\App_GlobalResources
  • Edit file CommonResources.en.resx in Notepad
  • Locate text:
    <data name="FormsSignInPageTitle" xml:space="preserve">
    <value>Sign In</value>
    </data>
  • Edit this text to be what you want
  • Save File and close


Remove or Change the Hostname Header Above the Login Box

  • Go to C:\inetpub\adfs\ls\MasterPages
  • Edit MasterPage.master.cs in Notepad
  • Locate text:
    {
    PageTitleLabel.Text = Page.Title;
    STSLabel.Text = FriendlyName;
    }
  • Change this text to what you want. Your text MUST BE IN QUOTES. Like this
    STSLabel.Text = "Contoso Limited Single Sign On";
  • Save File and close

Add an "Authorized Use" disclaimer or other text at bottom of page


  1. Go to C:\inetpub\adfs\ls\MasterPages
  2. Open MasterPage.Master in Notepad (not MasterPage.Master.cs)
  3. Locate text at the end of the file:
    <div class="MainActionContainer">
    <asp:ContentPlaceHolder ID="ContentPlaceHolder1" runat="server">
    </asp:ContentPlaceHolder>
    </div>
    </div>
    </form>
    </body>
    </html>
  4. Add a section here (added text hightlighted):
    <div class="MainActionContainer">
    <asp:ContentPlaceHolder ID="ContentPlaceHolder1" runat="server">
    </asp:ContentPlaceHolder>
    </div>
    <div class="GroupLargeMargin">
    <div class="TextSizeLarge">
    <asp:Label ID="STSFooter" runat="server"></asp:Label>
    </div>
    </div>

    </div>
    </form>
    </body>
    </html>
  5. Save file and close
  6. Edit file MasterPage.Master.cs in Notepad
  7. Locate text:
    protected void Page_Load( object sender, EventArgs e )
    {
    PageTitleLabel.Text = Page.Title;
    STSLabel.Text = FriendlyName;
    }
  8. Add a line (added text highlighted)
    protected void Page_Load( object sender, EventArgs e )
    {
    PageTitleLabel.Text = Page.Title;
    STSLabel.Text = FriendlyName;
    STSFooter.Text = "This is a secured, private computer system owned by Contoso. All Information contained on this system is deemed to be PRIVATE, PROPRIETARY, CONFIDENTIAL and the property of Contoso, Inc., its affiliates, divisions or subsidiaries. Unauthorized access or use is strictly prohibited. Any use of Contoso resources must be in compliance with Contoso policies including Electronic Mail/Communication; Information System Usage; Corporate Disclosure; Unauthorized Use of Software and the Code of Business Ethics. By using Contoso resources, you agree to comply with Contoso policies. Any unauthorized access to or use of Contoso Resources may be punishable in a court of law and may include termination of employment or contract with Contoso.<br>To protect your account from unauthorized access, Outlook Web Access automatically closes its connection to your mailbox after a period of inactivity. If your session ends, refresh your browser, and then log on again.";
    }
  9. This text is all on one line. If you need or want a linefeed in the text use <br>, like here.
  10. Save file and close
 

These are just a few of the theme elements you can fiddle with on the ADFS Proxy form. As you play with these, you will see other text tidbits you may want to adjust. Just be certain to follow my warnings and back everything up before and after your fiddling.